Concepts & Overview
Hermes-Five is a framework that gives Rust-programmed robots a consistent API and platform across several hardware systems.
Hermes-Five must give special kudos to Johnny-Five where it finds its inspiration.
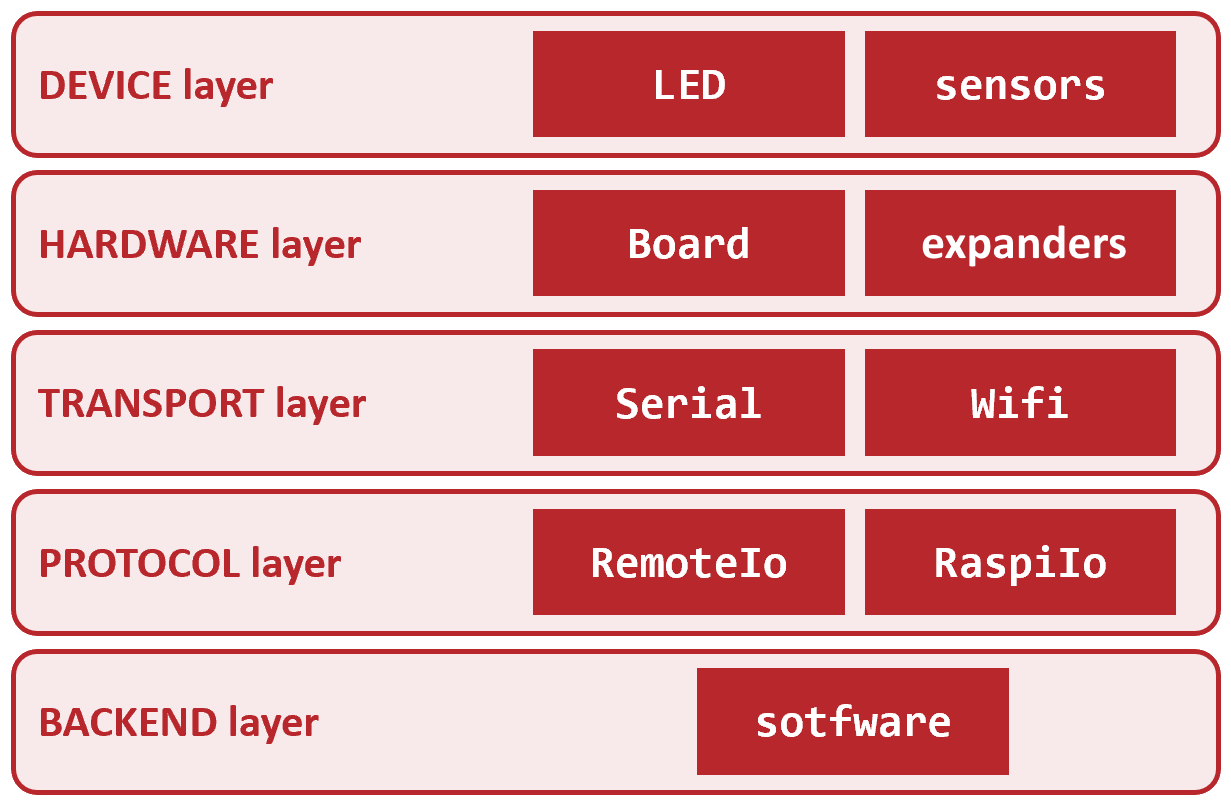
Architectural overview
Backend layer
The BACKEND layer: represents the machine where your code is running. It can be your computer, a raspberryPi or even your phone.
Your code must therefore be compiled for that targeted architecture.
Protocol layer
The PROTOCOL layer: defines how your backend will communicate with the board on the hardware layer. It usually requires an associated transport layer, but that is not always required.
All protocols must implement IoProtocol trait. RemoteIo and RaspiIo are examples of theses:
RemoteIo: allows you to control a distant Arduino (or Firmata compatible) board using a transport layer (see below).RaspiIo(coming in 0.2.0): allows you to control the IO pins of the raspberryPi where the backend code runs. It is specially designed to collocate the backend and the hardware, therefore remove the use of a transport layer.WARNING
Using
RemoteIoprotocol requires the board to implement a Firmata client. There are available for virtually all types of hardware.
Transport layer
The TRANSPORT layer: defines how the protocol sends its information to the hardware: but could be Serial, Wifi, Bluetooth, Infrared or whatever.
All transports must implement IoTransport trait. Serial and Ethernet are examples of theses:
Serial: communicates with the hardware board via a physical serial cable.Ethernet(coming in 0.2.0): communicates with the hardware board via a physical RJ45 cable.WiFi(coming in 0.2.0): communicates with the hardware board via a wifi connection.
Hardware layer
The HARDWARE layer: defines the real-world physical electronic board to be controlled by your software.
Usually an Arduino, but that could be anything, even another computer. Hermes-Five does not need to know its nature.
Board: The hardware must always define at least one board where devices will be attached to.
INFO
It is possible to add expanders between the board and some devices. Just switch the board by one of the available other Hardware.
PCA9685: Defines a PCA9685 attached itself to aBoard. Devices can now be controlled by the PCA9685 board.
Device layer
The DEVICE layer: defines the devices attached to the hardware. Those are the physical electronic device we ultimately want to control.
All devices must implement the Device trait as well as one or more of Ouput or Input traits depending on there kind.
Devices includes but are not limited to:
DigitalInput: Represents a digital input of unspecified type. Can be anything that sends on/off data on a digital pin.AnalogInput: Represents an analog input of unspecified type. Can be any sensor that sends 8bits data on an analog pin.DigitalOutput: Controls a digital pin in on/off mode. Can be linked to any type of device with an on/off state (led, relay, etc.).AnalogOutput: Controls an analog pin using an 8bits output. Can be linked to any type of analog device.PwmOutput: Controls a pwm pin using a square signal. Can be linked to any type of device.Led,Servo,Button, etc.: Specific implementations of the previous generic device types with convenience methods.
INFO
Using one of DigitalInput, AnalogInput, DigitalOutput, AnalogOutput, you can control (virtually) any type of devices that would not need a specific sub-library (nfc reader does for instance). The more specific devices are here for your convenience or to solve specific situations (nfc reader for instance).
Anatomy of a program
Let's dive into the basic anatomy of your Hermes-Five software.
Main function annotation
First thing to remember is that your program MUST be annotated with #[hermes_five::runtime].
This is the equivalent of a #[tokio::main] but adds some extra logic to ensure all callbacks and tasks are awaited to be done before the program ends.
Note how, just as in tokio, the main function have to be async.
#[hermes_five::runtime]
async fn main() {
  let board = Board::run();
  board.on(BoardEvent::OnReady, |board: Board| async move {
    // Do something here !
  });
}
Register board
Regarless of any logic you might want to implement, you must at some point create and open the communication with a Board.
To know more about how to configure a board regarding the protocol or transport to use, consult the board examples.
#[hermes_five::runtime]
async fn main() {
  let board = Board::run();
  board.on(BoardEvent::OnReady, |board: Board| async move {
    // Do something here !
  });
}
Wait until its ready
Note that your program execution continues without awaiting the board opening handshake to be done. That is the reason we have to await for the board to be connected in order to register some devices to it. ::: error Do not try to register devices before the OnReady event. Before handshake is done, the board object is not aware of its pin capacities and registering devices will therefore fail with an unknown pin error.
#[hermes_five::runtime]
async fn main() {
  let board = Board::run();
  board.on(BoardEvent::OnReady, |board: Board| async move {
    // Do something here ! //
  });
}- Consult documentation to know the callbacks parameters depending on the event your want to register.
- Note how the callback is an async method.
- Mind that callback must return a
Result<(), Error>
WARNING
All events callbacks takes an exact amount of parameters which is specified in the .on() method documentation. All callbacks with un-proper parameters will be skipped.
Control devices
The program will not stop its execution until the ready callback is done. Some functions (animation related) will need time, running in parallel with the rest of the program.
See the LED examples for more informations.
#[hermes_five::runtime]
async fn main() {
  let board = Board::run();
  board.on(BoardEvent::OnReady, |board: Board| async move {
    let mut led = Led::new(&board, 13, false)?;
    led.blink(100);
    Ok(())
  });
}
Do more...
Since the event callbacks are asynchronous and run in parallel with the rest of the program workflow, it is totally possible to do anything else in your software, including running multiple boards.
#[hermes_five::runtime]
async fn main() {

  // Blink a led on a first board (serial port COM3)
  let board1 = Board::new(RemoteIo::new("COM3")).open();
  board1.on(BoardEvent::OnReady, |board: Board| async move {
    let mut led = Led::new(&board, 13, false)?;
    led.blink(100);
    Ok(())
  });

  // Blink another led on a second board (serial port COM4)
  let board2 = Board::new(RemoteIo::new("COM4")).open();
  board2.on(BoardEvent::OnReady, |board: Board| async move {
    let mut led = Led::new(&board, 13, false)?;
    led.blink(500);
    Ok(())
  });

}